Creating a Web App in Angular 2.0
Angular is a popular framework for developing dynamic web applications. It’s developed and maintained by Google and a community of open-source developers.
The framework greatly simplifies front-end development work, increases developer productivity, and it’s even fun to program in!
What’s so different about Angular 2.0?
The next major version of Angular will not just be an upgrade, but a complete rewrite of the entire framework, and it will not be backwards compatible with previous versions of Angular.
It’s never a popular decision to break backwards compatibility, and the Angular community has not hold themselves back from telling Google this… repeatedly!
So why did the “don’t be evil” folks at Google decide to do it anyway?
The short story is that the web has evolved a lot since Angular was conceived in 2009, so there are a lot of new web standards (e.g. ECMAScript 6, TypeScript, Web Workers, Web Components) that Angular v1 is not using…
So instead of trying to force these new standards into an old framework, the Angular team thought it would be better to redesign the framework from scratch to truly embrace the new standards and reap all the benefits (e.g. speed of development, better support for large code bases, faster applications) and at the same time also rethink some of the less attractive elements of the framework (e.g. Angular v1 has 5 different ways to model a service and nobody really understands why).
Goodbye MVC! Hello Components!
One of the really big changes in Angular 2.0 is that it’s no longer based on the MVC architecture, but has moved on to a component-based architecture.
What does that mean?
In a component-based architecture you vertically divide your application into (UI) components. For example, in Facebook the Timeline could be one component, and the Chat Sidebar could be another one.
The idea is that each component contains all the stuff you would normally put in the different parts of the MVC.
Components can also be nested. So the Timeline component could be a root component, and then under it there could be a component for showing the posts on the timeline, and another component for showing a box to post new messages to the timeline.
Beside components, there are also modules for grouping a number of related components. For example, to represent a functional area within your application.
Finally, there are services (not to be confused with web services) that provides advanced functionality to the components. For example, handling communication back and forth with a REST Service.
Our Simple App
To get some hands-on experience, I thought it’d be fun to re-implement the Movie App in Angular 2.0. I have previously implemented the same app in Oracle JET, and Sandeep Panda originally coded it in Angular 1.3.
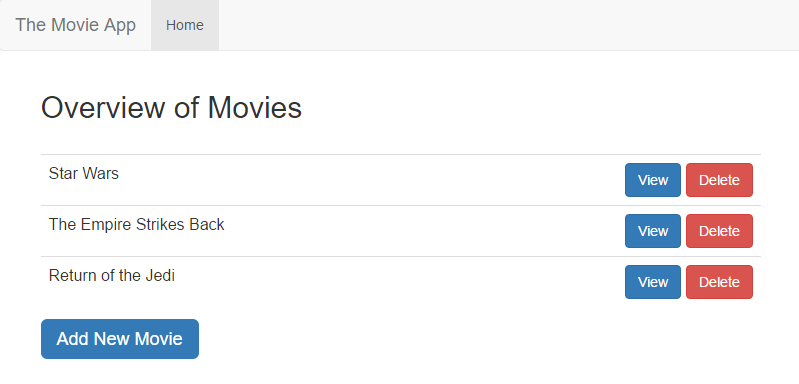
The Movie App is a simple CRUD web app where you can maintain your movie database. While it’s obviously a demo app, which could easily be beaten by an Excel spreadsheet, I think that for demo purposes it has several interesting features:
- A Single Page App (SPA) with multiple states (i.e. pages).
- Reuse of functionality across states.
- Passing parameters between states.
- Integration with RESTful web services.
You can see a screenshot below of the Movie App implemented in Angular 2:
I have used Twitter Bootstrap for the (minimal) UI. The simple reason is that Material Design (which is Google’s CSS/UI framework) for Angular 2.0 is still in alpha state, which is still a bit too early for me… Yes, I’m a chicken 😉
Getting Started
I used Angular 2.0 Release Candiate 5, which was the latest version at the point of writing.
For writing the code, I used the (free) Visual Studio Code editor, because it has excellent support for TypeScript, which is the default language for Angular 2.0.
If you want to run the Movie App example from this post, just follow these steps:
- Download and install Node.js and NPM (if you don’t already have them). I’m using Node.js 4.5.0 and NPM 2.15.9
- Download Angular2-movie-app.zip and extract it to a local folder.
- Open a command prompt and go to the angular2-movie-app folder.
- Run npm install in the command prompt.
- Run npm start in the command prompt.
And the Movie App should be automatically opened in your browser.
Designing the Movie App in Angular 2.0
The code structure of the Movie App is shown below:
/app
  main.ts
  movie.component.ts
  movie.module.ts
  movie.routing.ts
  /movies-overview
    movies-overview.component.ts
    movies-overview.component.html
  /movie-creator
    movie-creator.component.ts
    movie-creator.component.html
  /movie-editor
    movie-editor.component.ts
  /movie-viewer
    movie-viewer.component.ts
    movie-viewer.component.html
  /shared
    movie.ts
    movie-data.service.ts
The app is placed in a folder called app and inside it there’s a main.ts class as the entry point to the application.
There is also the movie root component (movie.component.ts), a routing file (movie.routing.ts) that handles navigation between the components, and a module (movie.module.ts) for storing the components.
There are four subfolders for components (i.e. /movies-overview, /movie-creator, /movie-editor, and /movie-viewer).
The /shared subfolder is for stuff that’s used by several components. In this case, it’s the movie.ts file, which is a class that represents a movie, and movie-data.service.ts, which is a service class that handles communication with the REST service.
The Movie Class
The first step in creating the Movie App is to create a Movie class (movie.ts):
export class Movie {
  _id: number;
  title: string;
  releaseYear: string;
  director: string;
  genre: string;
}
This step was not needed in Angular v1, but the benefit of explicitly defining the class (and its properties) is that it gives the IDE the information it needs to provide auto-completion, compile-time checking and other cool stuff.
Calling a REST Service
The next step is to create the MovieDataService class (movie-data.service.ts), which handles communication with the Movie REST Service.
import { Injectable } from '@angular/core';
import { Headers, Response, Http } from '@angular/http';

import 'rxjs/add/operator/toPromise';

import { Movie } from './movie';

@Injectable()
export class MovieDataService {
  private moviesUrl = 'http://movieapp-sitepointdemos.rhcloud.com/api/movies';

  constructor(private http: Http) { }

  getMovies(): Promise<movie[]> {
    return this.http.get(this.moviesUrl).toPromise().then(response => response.json() as Movie[]).catch(this.handleError);
  }

  getMovie(id: number) {
    return this.getMovies().then(movies => movies.find(movie => movie._id === id));
  }

  private post(movie: Movie): Promise {
    let headers = new Headers({'Content-Type': 'application/json'});
    return this.http.post(this.moviesUrl, JSON.stringify(movie), {headers: headers}).toPromise().then(res => res.json().data).catch(this.handleError);
  }

  private put(movie: Movie) {
    let headers = new Headers();
    headers.append('Content-Type', 'application/json');
    let url = `${this.moviesUrl}/${movie._id}`;
    return this.http.put(url, JSON.stringify(movie), {headers: headers}).toPromise().then(() => movie).catch(this.handleError);
  }

  delete(movie: Movie): Promise {
    let url = `${this.moviesUrl}/${movie._id}`;
    return this.http.delete(url).toPromise().catch(this.handleError);
  }

  save(movie: Movie): Promise {
    if(movie._id) {
      return this.put(movie);
    } else {
      return this.post(movie);
    }
  }

  private handleError(error: any) {
    console.log('An error occured: ', error);
    return Promise.reject("error message: " + error);
  }
}
The code itself is pretty straight forward. It provides some CRUD methods to call the REST service, and each method returns a promise, so service calls can be asynchronous.
But I really missed the nice $resource service in earlier versions of Angular where we got the same functionality in just a few lines of code:
angular.module('movieApp.services', []).factory('Movie', function($resource) {
  return $resource('http://movieapp-sitepointdemos.rhcloud.com/api/movies/:id', { id: '@_id' }, {
    update: { method: 'PUT' }
  });
});
It’s not a big deal to write the service class by hand, it just makes the road towards the code you actually want to write a little bit longer. But hopefully a $resource replacement is on the way for Angular 2.0.
Develop a Component
Now that we have the Movie and MovieDataService classes ready, we can start developing components.
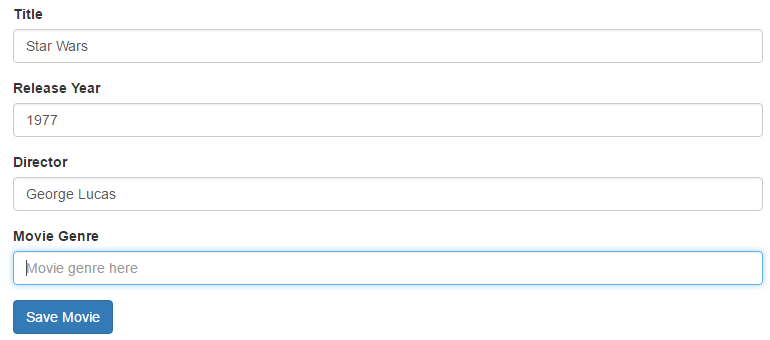
Let’s take a closer look at MovieCreatorComponent (Movie-Creator.component.ts), which is used for adding new movies to the app.
But before we dive into the code, let’s have a quick look to see how the component looks from a UI perspective:
From a technical point of view, the component is just a class with the @Component decorator (kind of like annotations in Java):
import { Component } from '@angular/core';
import { Router } from '@angular/router';

import { Movie } from '../shared/movie';
import { MovieDataService } from '../shared/movie-data.service';

@Component({
  templateUrl: 'app/movie-creator/movie-creator.component.html'
})
export class MovieCreatorComponent {
  movie: Movie = new Movie();

  constructor(private router: Router, private movieDataService: MovieDataService) { }

  saveMovie() {
    this.movieDataService.save(this.movie);
    this.router.navigate(['/movies']);
  }
}
In the constructor, we say that a router (for navigating to other components) and a movieDataService (for calling the REST Service) should be injected into the component, and stored in two private variables, which we don’t need to declare explicitly.
In the saveMovie methods, we save the movie using the REST Service, and navigates back to the movie overview.
In the @Component decorator, we use the templateUrl property to say what template should be used for the component.
You can see the content of movie-creator.component.html below:
<div class="form-group">
  <label for="title">Title</label>
  <input type="text" [(ngModel)]="movie.title" class="form-control" id="title" placeholder="Movie Title Here"/>
</div>
<div class="form-group">
  <label for="year">Release Year</label>
  <input type="text" [(ngModel)]="movie.releaseYear" class="form-control" id="year" placeholder="When was the movie released?"/>
</div>
<div class="form-group">
  <label for="director">Director</label>
  <input type="text" [(ngModel)]="movie.director" class="form-control" id="director" placeholder="Who directed the movie?"/>
</div>
<div class="form-group">
  <label for="genre">Movie Genre</label>
  <input type="text" [(ngModel)]="movie.genre" class="form-control" id="genre" placeholder="Movie genre here"/>
</div>
<div class="form-group">
  <input (click)="saveMovie()" type="submit" class="btn btn-primary" value="Save Movie"/>
</div>
The template is basically HTML with a couple of Angular extensions:
We use [(ngModel)] to bind an HTML input field to a property in the component class, so that the property in the component class is automatically updated when a user enters something in the input field.
For example, [(ngModel)]=”movie.title” will bind HTML input field to the title of the movie property in the component class, so when a user enters a title it is automatically stored in movie.title property.
In the same way, we use (click) to bind an HTML button to a method in the component class.
For example, (click)=”saveMovie()” makes sure that when a user clicks the “Save Movie” button then the component’s saveMovie() method will be automatically called.
In my opinion, the component approach feels really nice to work with, but it’s hard to explain why, it just feels “brain-friendly”. Maybe it’s because the code structure follows the UI structure you see on the screen.
Conclusion
My first impression of Angular 2.0 was that I was surprised by the upfront costs (e.g. installing npm packages, setting up configuration files) compared to the earlier versions where I just linked to a CDN and then I was ready to start coding.
On top of that, I also needed to create classes and hand-code the calls to the REST Service, which also felt like a hassel when your fingers are aching to start coding all the fun stuff!
But once you have made this initial investment, it starts to pay off (easier to rename classes, typos in the code are spotted instantly, really nice and fast auto-completion), which was extremely helpful when I started coding the components.
The components were the most positive surprise. It just felt like a much nicer way to structure the code compared to the old MVC approach.
If you want to get started with Angular 2, I can recommend the architecture overview document for a quick overview of the framework, the 5 Min Quickstart to learn how to install the framework from scratch, and the Tour of Heroes tutorial as a great way to learn a lot about the functionality that the framework offers.